How to Package and Deploy FerretDB with Acorn

In this blog post, we will explore how to build, package, and deploy a Python application that uses a FerretDB database with Acorn.
FerretDB is an open-source document database alternative for MongoDB that provides PostgreSQL or SQLite as database backend options. This means you can use FerretDB for production environments without worrying about vendor lock-in. And by using Acorn, you can easily make deployments easier.
Acorn is a simplified Kubernetes-based application deployment framework for developers and software engineers. Suppose you have a Python application with FerretDB as the database; you can easily deploy it using Acorn.
With Acorn, you have a fully managed development platform for running cloud-native applications. It provides a layer of abstraction on top of Kubernetes, so there's no need to interact with Kubernetes YAML files directly. Instead, Acorn provides application-level constructs such as Docker containers, app configurations, and deployment specifications.
Let's get into it.
Prerequisites
We will set up a Python application with FerretDB as the database and deploy it with Acorn. This blog post is adapted from the Acorn setup guide for a MySQL database.
For the guide, we'll need the following:
- Acorn CLI (GitHub account to sign up for the Acorn platform)
Installing Acorn
First, we need to install the Acorn CLI.
This will enable us to run acorn commands directly from our CLI.
For macOS & Linux, run this command.
brew install acorn-io/cli/acorn
For Windows, download the CLI from this URL:
scoop install acorn
Once Acorn is installed, log in via your GitHub account by running:
acorn Login
You will be prompted to create an Acorn account using your GitHub account. Once logged in, return to the terminal.
Setting up the Python Application
We will start by setting up a simple todo Python Flask Application that connects with FerretDB, which uses an AWS RDS for PostgreSQL as the backend.
Let's create the directory for the project:
mkdir -p my-ferret/templates
cd my-todo
touch app.py requirements.txt templates/template.html Dockerfile Acornfile
Here, we've created the app.py file that will contain our python application.
The structure of the directory should look like this.
my-ferret/
│
├── app.py                # Main Python application file
├── requirements.txt      # Python dependencies
├── Dockerfile            # Docker configuration file
├── Acornfile             # Acorn configuration file
│
└── templates/            # Directory for HTML templates
    └── template.html     # HTML template file
In the app.py folder, add the below code.
import os
from flask import Flask, render_template, request, redirect, url_for
from pymongo import MongoClient
from bson.objectid import ObjectId

app = Flask(__name__)

db_uri = os.environ["DB_URI"]
db_name = os.environ["DB_NAME"]

print("DB_URI:", db_uri)
print("DB_NAME:", db_name)

client = MongoClient(db_uri)
db = client[db_name]
todos_collection = db['todos']

def redirect_url():
    return request.args.get('next') or \
            request.referrer or \
            url_for('home')

@app.route("/")
def home():
    todo_list = list(todos_collection.find({}))
    return render_template("template.html", todo_list=todo_list)

@app.route("/add", methods=["POST"])
def add():
    title = request.form.get("title")
    new_todo = {"title": title, "done": False}
    todos_collection.insert_one(new_todo)
    return redirect(redirect_url())

@app.route("/update/<todo_id>")
def update(todo_id):
    todo = todos_collection.find_one({"_id": ObjectId(todo_id)})
    todos_collection.update_one({"_id": ObjectId(todo_id)}, {"$set": {"done": not todo["done"]}})
    return redirect(redirect_url())

@app.route("/delete/<todo_id>")
def delete(todo_id):
    todos_collection.delete_one({"_id": ObjectId(todo_id)})
    return redirect(redirect_url())

if __name__ == "__main__":
    app.run(debug=True)
Our Python application uses the Flask framework to serve web pages and connects to our FerretDB through pymongo.
Not surprising since FerretDB is compatible with most MongoDB applications and tools, including [**List some apps and link here].
With pymongo handling the interaction with FerretDB, we populate a todos collection within our database, where each task is managed through CRUD operations – create, read, update, and delete – executed against our database.
Our Acornfile abstracts the database URI and name in this Python file by specifying environment variables.
Next, we'll, we'll create a functional UI for these actions using the templates/templates.html file.
<!doctype html>
<html lang="en">
  <head>
    <meta charset="UTF-8" />
    <meta name="viewport" content="width=device-width, initial-scale=1.0" />
    <title>Todo App</title>

    <link
      rel="stylesheet"
      href="https://cdn.jsdelivr.net/npm/semantic-ui@2.4.2/dist/semantic.min.css"
    />
    <script src="https://cdn.jsdelivr.net/npm/semantic-ui@2.4.2/dist/semantic.min.js"></script>
  </head>

  <body>
    <div style="margin-top: 50px;" class="ui container">
      <h1 class="ui center aligned header">To Do App</h1>

      <form class="ui form" action="/add" method="post">
        <div class="field">
          <label>Todo Title</label>
          <input type="text" name="title" placeholder="Enter Todo..." /><br />
        </div>
        <button class="ui blue button" type="submit">Add</button>
      </form>

      <hr />

      <div class="ui items">
        {% for todo in todo_list %}
        <div class="item">
          <a href="/update/{{ todo.id }}">
            {% if todo.done == False %}
            <i class="large square outline icon"></i>
            {% else %}
            <i class="large green check square icon"></i>
            {% endif %}
          </a>
          <div class="middle aligned content">
            <div class="header">{{ todo.title }}</div>
          </div>
          <a href="/delete/{{ todo.id }}">
            <i class="red trash alternate icon"></i>
          </a>
        </div>
        {% endfor %}
      </div>
    </div>
  </body>
</html>
In the requirements file, we need to specify the dependencies required to run the applications, and this is all scripted in the Dockerfile and run during build.
Flask==2.3.2
pymongo
Creating a Dockerfile for the Python Application
To containerize our Python application, we'll use a Dockerfile containing all the commands needed to build a Docker image. The Dockerfile creates a container image that sets up the environment, installs dependencies, and configures the Flask application to run within an isolated Docker container.
FROM cgr.dev/chainguard/python:latest-dev

WORKDIR /app
COPY requirements.txt .
RUN pip install -r requirements.txt --user

COPY . .

ENV FLASK_APP app.py
ENV FLASK_ENV development
ENV FLASK_RUN_HOST 0.0.0.0
ENV FLASK_RUN_PORT 8000

EXPOSE 8000
ENTRYPOINT ["python", "-m", "flask", "run"]
Authoring an Acornfile
To fully deploy our Python application using Acorn, we'll need to prepare an Acornfile. Acornfiles are simple config files that describe containers, services, apps, volumes, secrets, and deployment information. In the same manner that Dockerfiles are built into a Docker image, Acornfiles are compiled into Acorn images.
In that case, our Acornfile will contain essentially all the configuration for the entire application, including Docker build, database setup, secrets, containers, deployment information, etc.
To set up the Acornfile, add the following contents to the file.
services: postgres: {
    image: "ghcr.io/acorn-io/postgres:v15.#-#"
}

containers: {
  app: {
    build: context: "."
    ports: publish: "8000/http"
    env: {
      DB_URI: "mongodb://@{service.postgres.secrets.admin.username}:@{service.postgres.secrets.admin.password}@ferretdb/ferretdb?authMechanism=PLAIN"
      DB_NAME: "ferretdb"
    }
    dependsOn: [
      "ferretdb"
    ]
    if args.dev {
    files: {
      "/src": "./"
    },
    env: FLASK_DEBUG: "1"
  }
  }
  ferretdb: {
    image: "ferretdb/ferretdb"
    ports: publish: "27017/tcp"
    consumes: ["postgres"]
    env: {
      FERRETDB_POSTGRESQL_URL: "postgres://@{service.postgres.secrets.admin.username}:@{service.postgres.secrets.admin.password}@@{service.postgres.address}"
    }
  }
}
In the Acornfile, we have declared a postgres service that will serve as the PostgreSQL backend for our FerretDB database.
The Acorn postgres runs a single postgres container backed by a persistent volume and admin credentials.
The service is not considered highly available and can be easily replaced with other service interfaces like AWS RDS for PostgreSQL for production environments.
The admin credentials for postgres include:
- POSTGRES_HOST:
@{service.db.address} - POSTGRES_DB:
@{service.db.data.dbName} - POSTGRES_USER:
@{service.db.secrets.admin.username} - POSTGRES_PASSWORD:
@{service.db.secrets.admin.password}
The admin credentials are then consumed by the ferretdb container via @{service.db.xxx} variables.
To connect to the postgres backend, we will specify the postgres for the FERRETDB_POSTGRESQL_URL environment variable.
Our app container will connect via the DB_URI and DB_NAME, which points to the FerretDB connection URI.
We've also set up dev configurations for the app to enable easy development with live code updates and debugging features.
Deploy FerretDB application with Acorn
With our current setup, we can go ahead to deploy the application.
Through your CLI, run the following command from the same directory as your Acornfile to build and run the app.
acorn run -n my-ferret
Once it's finished building, you'll get a URL to connect to the app endpoint.
┌───────────────────────────────────────────────────────────────────────────────────────────────────────────────────────────────────────────────────────────────────────────────────────┐
| STATUS: ENDPOINTS[https://my-ferret-91916df9.qactc6.on-acorn.io, tcp://k8s-myferret-ferretdb-0c404ccc3f-0e3f1499f0b768c7.elb.us-east-2.amazonaws.com:27017] HEALTHY[2] UPTODATE[2] OK |
└───────────────────────────────────────────────────────────────────────────────────────────────────────────────────────────────────────────────────────────────────────────────────────┘
With the URL, we can access the todo application. From the application, when we add a new task, it is inserted into our FerretDB database with PostgreSQL as the backend.
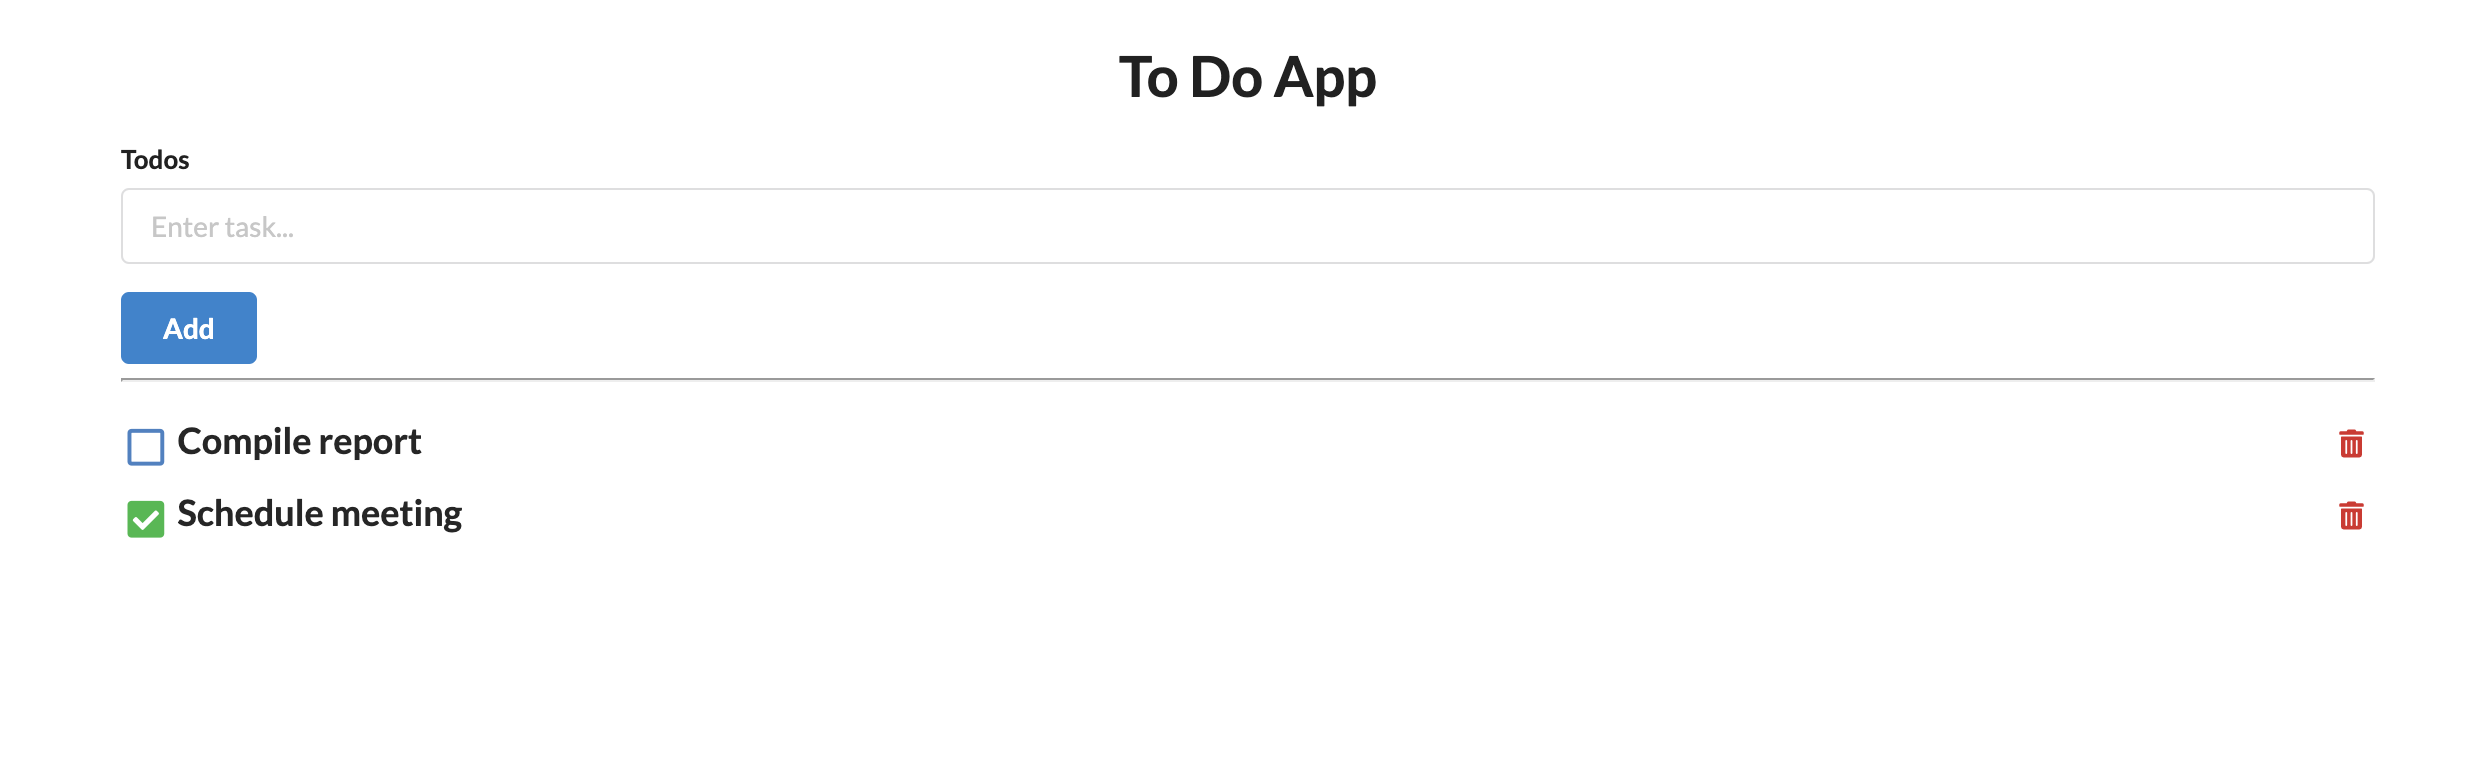
We can also perform other CRUD operations on the database to delete or update the state as marked or unmarked.
Building and Publishing Acorn Images
When the development phase ends and we're ready to share the my-ferret app, we can also package it into a container image using Acorn.
Acorn makes this possible using commands that are simple and similar to traditional Docker workflows.
To create an Acorn container image for the my-ferret app, use the following convention with your desired registry, organization, application name, and version:
acorn build -t <registry>/<organization>/<app-name>:<version> .
In that case, if we want to tag an image for Docker Hub, run the build command within the same project directory:
acorn build -t index.docker.io/<organization>/my-ferret:v1.0 .
This command compiles the application source, along with any dependencies defined in the Acornfile, into a container image.
The -t flag assigns a tag to the image.
Ensure to replace the registry if you're not using Docker Hub, and also specify the organization or username for the account.
Before pushing the image to a registry, log in using the acorn login command:
acorn login index.docker.io
Once you're logged in successfully, use the acorn push command to upload the image to the desired registry:
acorn push index.docker.io/<organization>/my-ferret:v1.0
Once the image is available in a registry, it can be deployed to any environment with access to the registry.
The acorn run command will retrieve and deploy the image:
acorn run index.docker.io/<organization>/my-ferret:v1.0
Alternatively, if you need to manually pull the image to your local machine, use:
acorn pull index.docker.io/<organization>/my-ferret:v1.0
Following these steps ensures that our todo app, built using FerretDB, is correctly containerized, tagged, and ready for deployment across your production environments with Acorn.
Cleanup
Once we're done, clean up and delete the application by running:
acorn rm my-ferret
This will remove the application and containers.
Conclusion
To sum up, we explored the integration of FerretDB into Python applications and how to package and deploy it using Acorn. Acorn makes it easy to encapsulate complex services, secrets, containers, jobs, and configurations for your applications.
Moreover, with Acorn and FerretDB being open source, you won't have to worry about vendor lock-in. So whether you're tinkering with new ideas or applications for production, FerretDB is an ideal option.
For more information on FerreDB, check out the docs or contact any of our community channels for help.
Give it a go – deploy your FerretDB app with Acorn.