How to Configure FerretDB to Work on Percona Distribution for PostgreSQL

Imagine being able to leverage the flexibility and simplicity of the MongoDB query language through FerretDB together with the robust enterprise PostgreSQL tools and services provided by Percona.
That's exactly what you get when you configure FerretDB for your Percona Distribution for PostgreSQL!
In this article, we'll guide you through the advantages of using FerretDB and how you can configure it to work natively on Percona Distribution for PostgreSQL and explore how FerretDB's stored data appear in PostgreSQL.
Before we go into the technical details, let's find out what these two solutions are all about.
What is Percona Distribution for PostgreSQL?
Percona Distribution for PostgreSQL is a software package provided by Percona, a world-class company that provides open source database software, support, and services.
Basically, this is a distribution of the PostgreSQL database management system (DBMS) that includes enhanced features to make it more manageable, scalable, and performant.
PostgreSQL database, widely used by millions of developers across the globe, has had a significant impact on open-source development.
 source: PostgreSQL website
Many software companies have built their applications on top of the database, extended its functionality, and provided robust infrastructures and services for it. Percona is one of those companies, and have contributed immensely to the ecosystem with their array of PostgreSQL tools, extensions, and services.
With the PostgreSQL Distribution provided by Percona, users get an enhanced version of the PostgreSQL DBMS itself, containing optimized features for better query performance, storage engine, and monitoring capabilities.
Notable solutions in the Percona Distribution for PostgreSQL include pgAudit, pgBackRest, Patroni, pgRepack, among others.
Introducing FerretDB
FerretDB is open source document database that acts as a MongoDB alternative for users looking for open-source solutions with the same query language and commands, ease of use, and flexibility.
Using PostgreSQL as the backend, FerretDB converts the wire protocols of MongoDB to SQL, enabling you to manage MongoDB workloads with PostgreSQL.
This means you can take advantage of many MongoDB tools as well while leveraging all the operational and management features for your PostgreSQL DBMS. Pretty neat, right? We think so too.
FerretDB works natively with Percona Distribution for PostgreSQL, meaning you can take advantage of all its exceptional PostgreSQL features right out of the box, such as backup, monitoring, and more.
Setting up environment and packages
Prerequisites
We'll be using the Debian package for both FerretDB and Percona Distribution for PostgreSQL, so having a Unix-like operating system such as Ubuntu is important.
You also need to remove any preexisting installation of PostgreSQL to avoid conflicts. To remove PostgreSQL, use the following command:
sudo apt-get --purge remove postgresql
Also, you'll need to download the Studio 3T linux version; we'll be using the MongoDB GUI tool to showcase how FerretDB works with Percona Distribution for PostgreSQL.
Installation
We need to install the Debian packages for both software.
Installing Debian Package of Percona Distribution for PostgreSQL
Start by downloading the Debian package for Percona release packages.
wget https://repo.percona.com/apt/percona-release_latest.$(lsb_release -sc)_all.deb
Then you can go ahead to install the package using dpkg:
sudo dpkg -i percona-release_latest.$(lsb_release -sc)_all.deb
Once that's done, you should refresh your local cache:
sudo apt update
See here for the installation guide on all the PostgreSQL solutions provided by Percona.
The next step is to install the latest version of Percona Distribution for PostgreSQL from the repositories provided by Percona.
sudo percona-release setup ppg-15
sudo apt install percona-ppg-server-15
At this point, you should have the Percona Distribution for PostgreSQL running on your system. Run this command just to be sure:
sudo systemctl status postgresql.service
FerretDB Debian Download
Now let's download the Debian package for FerretDB. We are going to download the latest version which is FerretDB v1.4.0. You can find the latest version on the releases here:
wget https://github.com/FerretDB/FerretDB/releases/download/v1.4.0/ferretdb.deb
Once downloaded, install FerretDB using this command:
sudo dpkg -i ferretdb.deb
Please check that the installation works fine by running ferretdb --version.
Configuring Percona Distribution for PostgreSQL to work with FerretDB
The FerretDB installation does not include PostgreSQL or any other backend so you'll need to have that separately and since you have Percona Distribution for PostgreSQL installed, then we can use that.
And since we're already running Percona Distribution for PostgreSQL, we can just connect to it.
To connect to the Percona Distribution for PostgreSQL using appropriate FerretDB flags, run the command:
ferretdb --handler=pg --postgresql-url=postgres://127.0.0.1:5432/ferretdb --listen-addr=127.0.0.1:27017
Great! We've connected to the Percona Distribution for PostgreSQL and we're ready to start using FerretDB.
Note that FerretDB provides a list of flags for configuring your database – see them here.
From a new terminal, let's access the PostgreSQL command line:
sudo su - postgres -c psql
In the psql terminal, we are going to create a database to hold all data that'll be passed through the MongoDB URI.
CREATE DATABASE ferretdb;
Create a new user with username and password privileges:
CREATE USER username WITH PASSWORD 'password';
Be sure to set the database, username, and password to your preferred options.
Grant all privileges on the ferretdb database to the new user:
GRANT ALL PRIVILEGES ON DATABASE ferretdb TO username;
Now, you should be able to connect to FerretDB using the following MongoDB URI format on any MongoDB tools or GUI.
Experimenting with FerretDB through Studio 3T
To showcase the connection of FerretDB and Percona Distribution, we'll need to use mongosh or any MongoDB GUI tool.
For the purpose of this guide, we'll be using Studio 3T – a MongoDB GUI tool.
Once Studio 3T is installed, launch the application and add a connection using the right MongoDB URI.
mongodb://username:password@127.0.0.1/ferretdb?authMechanism=PLAIN
After setting up the connection, navigate and switch the context to the ferretdb database.
Using the Intellishell, let's insert some documents through the shell on Studio 3T.
db.test.insertMany([
  {
    name: 'John Doe',
    email: 'johndoe@example.com',
    age: 30,
    gender: 'Male',
    interests: ['reading', 'hiking', 'photography'],
    address: {
      street: '123 Main St',
      city: 'Anytown',
      state: 'CA',
      zip: '12345'
    }
  },
  {
    name: 'Jane Smith',
    email: 'janesmith@example.com',
    age: 25,
    gender: 'Female',
    interests: ['painting', 'travel', 'yoga'],
    address: {
      street: '456 Elm St',
      city: 'Othertown',
      state: 'NY',
      zip: '67890'
    }
  },
  {
    name: 'Bob Johnson',
    email: 'bjohnson@example.com',
    age: 40,
    gender: 'Male',
    interests: ['cooking', 'gardening', 'fishing'],
    address: {
      street: '789 Oak St',
      city: 'Somewhere',
      state: 'TX',
      zip: '23456'
    }
  },
  {
    name: 'Samantha Lee',
    email: 'slee@example.com',
    age: 28,
    gender: 'Female',
    interests: ['music', 'dancing', 'skiing'],
    address: {
      street: '321 Pine St',
      city: 'Anotherplace',
      state: 'FL',
      zip: '34567'
    }
  }
])
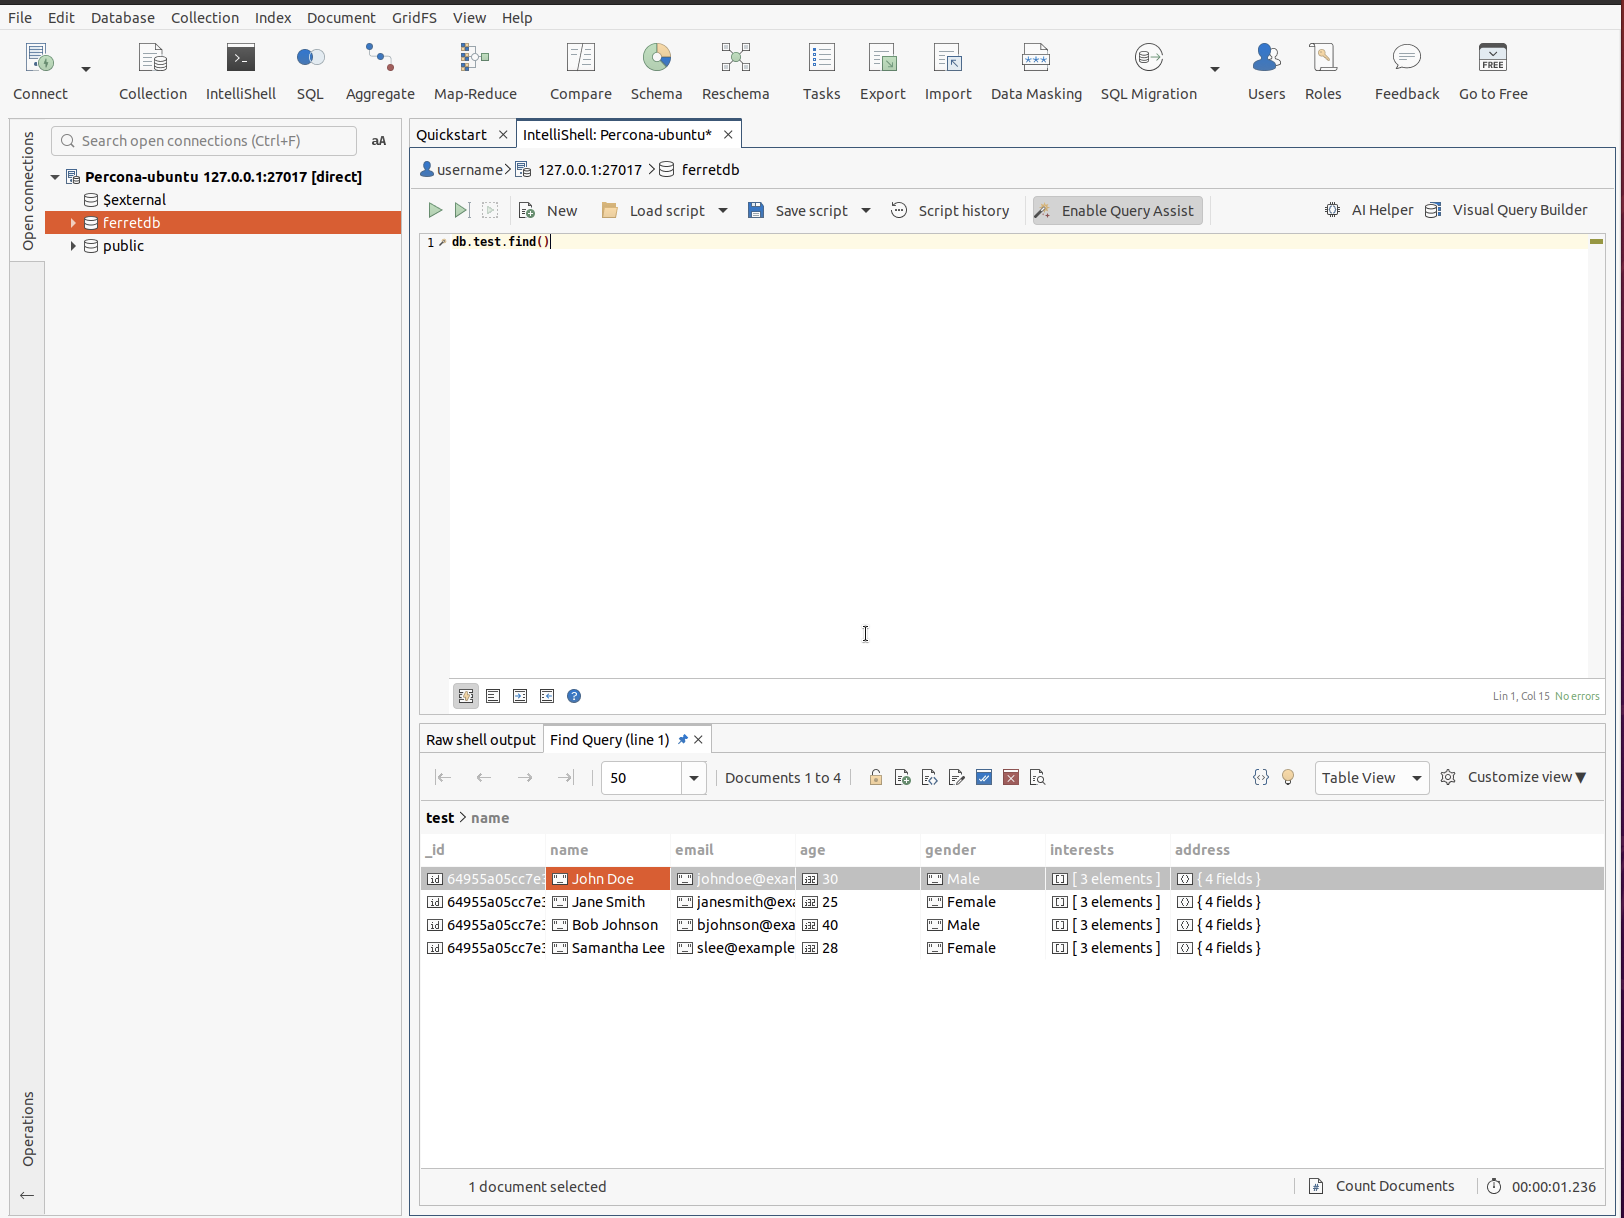
What we want to do now is to explore and view the data we just inserted through FerretDB on the Percona Distribution for PostgreSQL.
In your terminal, we will open a new psql terminal that takes us directly to the ferretdb database we created earlier, and contains our data.
~$ sudo su - postgres
postgres@Alexander-ubuntu:~$ psql ferretdb
psql (15.2 - Percona Distribution, server 13.10 - Percona Distribution (Ubuntu 2:13.10-1.focal))
Type "help" for help.
ferretdb database should now be in context.
Let's proceed by setting SET search_path TO ferretdb; and then displaying the tables (this is akin to the collection we created earlier) in the database using \dt.
ferretdb=# set search_path to ferretdb;
SET
ferretdb=# \dt
                     List of relations
  Schema  |            Name             | Type  |  Owner
----------+-----------------------------+-------+----------
 ferretdb | _ferretdb_database_metadata | table | username
 ferretdb | test_afd071e5               | table | username
(2 rows)
We can see two tables: one containing the metadata for the database and the other containing the test collection we created on Studio 3T.
Let's view the table content in PostgreSQL:
ferretdb=# table test_afd071e5;
                                                                                                                                                                                                                                                                                                                                                                                   _jsonb

----------------------------------------------------------------------------------------------------------------------------------------------------------------------------------------------------------------------------------------------------------------------------------------------------------------------------------------------------------------------------------------------------------------------------------------------------------------------------------------------------------------------------------------------------------------------------------------------------------------------------------------------------------------------------------------------------------------------------------------------------------------------------
 {"$s": {"p": {"_id": {"t": "objectId"}, "age": {"t": "int"}, "name": {"t": "string"}, "email": {"t": "string"}, "gender": {"t": "string"}, "address": {"t": "object", "$s": {"p": {"zip": {"t": "string"}, "city": {"t": "string"}, "state": {"t": "string"}, "street": {"t": "string"}}, "$k": ["street", "city", "state", "zip"]}}, "interests": {"i": [{"t": "string"}, {"t": "string"}, {"t": "string"}], "t": "array"}}, "$k": ["_id", "name", "email", "age", "gender", "interests", "address"]}, "_id": "64955a05cc7e30485cdeeee3", "age": 30, "name": "John Doe", "email": "johndoe@example.com", "gender": "Male", "address": {"zip": "12345", "city": "Anytown", "state": "CA", "street": "123 Main St"}, "interests": ["reading", "hiking", "photography"]}
 {"$s": {"p": {"_id": {"t": "objectId"}, "age": {"t": "int"}, "name": {"t": "string"}, "email": {"t": "string"}, "gender": {"t": "string"}, "address": {"t": "object", "$s": {"p": {"zip": {"t": "string"}, "city": {"t": "string"}, "state": {"t": "string"}, "street": {"t": "string"}}, "$k": ["street", "city", "state", "zip"]}}, "interests": {"i": [{"t": "string"}, {"t": "string"}, {"t": "string"}], "t": "array"}}, "$k": ["_id", "name", "email", "age", "gender", "interests", "address"]}, "_id": "64955a05cc7e30485cdeeee4", "age": 25, "name": "Jane Smith", "email": "janesmith@example.com", "gender": "Female", "address": {"zip": "67890", "city": "Othertown", "state": "NY", "street": "456 Elm St"}, "interests": ["painting", "travel", "yoga"]}
 {"$s": {"p": {"_id": {"t": "objectId"}, "age": {"t": "int"}, "name": {"t": "string"}, "email": {"t": "string"}, "gender": {"t": "string"}, "address": {"t": "object", "$s": {"p": {"zip": {"t": "string"}, "city": {"t": "string"}, "state": {"t": "string"}, "street": {"t": "string"}}, "$k": ["street", "city", "state", "zip"]}}, "interests": {"i": [{"t": "string"}, {"t": "string"}, {"t": "string"}], "t": "array"}}, "$k": ["_id", "name", "email", "age", "gender", "interests", "address"]}, "_id": "64955a05cc7e30485cdeeee5", "age": 40, "name": "Bob Johnson", "email": "bjohnson@example.com", "gender": "Male", "address": {"zip": "23456", "city": "Somewhere", "state": "TX", "street": "789 Oak St"}, "interests": ["cooking", "gardening", "fishing"]}
 {"$s": {"p": {"_id": {"t": "objectId"}, "age": {"t": "int"}, "name": {"t": "string"}, "email": {"t": "string"}, "gender": {"t": "string"}, "address": {"t": "object", "$s": {"p": {"zip": {"t": "string"}, "city": {"t": "string"}, "state": {"t": "string"}, "street": {"t": "string"}}, "$k": ["street", "city", "state", "zip"]}}, "interests": {"i": [{"t": "string"}, {"t": "string"}, {"t": "string"}], "t": "array"}}, "$k": ["_id", "name", "email", "age", "gender", "interests", "address"]}, "_id": "64955a05cc7e30485cdeeee6", "age": 28, "name": "Samantha Lee", "email": "slee@example.com", "gender": "Female", "address": {"zip": "34567", "city": "Anotherplace", "state": "FL", "street": "321 Pine St"}, "interests": ["music", "dancing", "skiing"]}
(4 rows)
Brilliant! Just by using FerretDB, we've been able to store data using MongoDB commands and query language and have it displayed in Percona Distribution for PostgreSQL.
Round-up
As we've showcased in this guide, FerretDB gives you the chance to run and manage MongoDB production workloads in PostgreSQL; by having Percona Distribution for PostgreSQL as your backend, you can tap into all the other open source enterprise tools, extensions, and services provided by Percona – and they all work seamlessly together!
For enterprise users already familiar with PostgreSQL management, this is a great way to also leverage your existing knowledge and skills, for backup, monitoring, security, replication, and so on.
FerretDB is an open source project, and as such we welcome all contributions and feedback that can help us improve it. So please do check our GitHub repository and feel free to leave a comment on any of our channels.
And if you would like to learn more on how to get started with FerretDB, please check out our installation guide.