Full-Stack Observability with HyperDX and FerretDB

In complex application environments, understanding system behavior, diagnosing issues, and ensuring performance requires robust observability. HyperDX is an open-source observability platform that analyzes and visualizes the logs, traces, metrics, and session replays from your applications and infrastructure.
HyperDX relies on a MongoDB instance to store application state, including dashboards, saved searches, user credentials, and alerts. At FerretDB, we're dedicated to providing a truly open-source alternative to MongoDB, leveraging the reliability and power of PostgreSQL as its backend.
In this blog post, we're excited to explore how HyperDX seamlessly integrates with FerretDB, offering a truly open-source stack solution for collecting and analyzing your application data.
What is HyperDX?
HyperDX is an open-source, developer-friendly platform that consolidates all your observability data in one place. It helps engineering teams quickly find and debug issues by providing:
- Unified logs, traces, and metrics: Comprehensive visualization of data from various sources in a single view.
- Full text search: Intuitive full-text and property search capabilities.
- APM (Application Performance Monitoring): Monitor application performance and identify bottlenecks.
- Intuitive dashboards: Visualize your data with customizable dashboards.
- Intelligent alerting: Set up alerts for anomalies and critical events.
HyperDX aims to simplify troubleshooting and provide in-depth insights into your application's health and user experience, ensuring faster debugging and improved reliability.
Why Use HyperDX with FerretDB?
HyperDX primarily uses MongoDB to store its application data, including user credentials, dashboards, session recordings, saved searches, alerts, and metric aggregates. Given that FerretDB is designed to be a truly open-source alternative to MongoDB, it can serve as a drop-in replacement for HyperDX's MongoDB database.
- Open-source: Both HyperDX and FerretDB are open-source projects, providing transparency, flexibility, and strong community backing, aligning perfectly with an open-source ethos for your entire observability stack.
- Simplified infrastructure: If your existing data infrastructure is already based on PostgreSQL, integrating HyperDX with FerretDB can streamline your database management and reduce operational overhead for your observability solution.
- No vendor lock-in: Enjoy the freedom of truly open-source solutions without concerns about proprietary licensing or vendor lock-in.
Connecting HyperDX to FerretDB
Connecting a self-hosted HyperDX instance to your FerretDB instance is straightforward, as HyperDX expects a MongoDB-compatible database. Here's a step-by-step guide to get you started:
-
Ensure FerretDB is running: Make sure your FerretDB instance is active and accessible. You can set it up with the FerretDB evaluation image, by running the following command:
 docker run -d --name ferretdb -p 27017:27017 \
 -e POSTGRES_USER=<username> \
 -e POSTGRES_PASSWORD=<password> \
 -v ./data:/var/lib/postgresql/data \
 ghcr.io/ferretdb/ferretdb-eval:2
Replace
<username>and<password>with your desired authentication credentials.If you want to explore more installation options, refer to our FerretDB Installation Guide.
-
Set up HyperDX: You can run HyperDX as a standalone Docker container or as part of a Docker Compose setup. For this guide, we'll use the Docker Compose setup provided by HyperDX, as it conveniently bundles all necessary components like the OpenTelemetry Collector and ClickHouse, allowing for a quick and comprehensive demonstration of data ingestion and visualization.
Start by cloning the HyperDX repository and switch to the
v2branch, which contains the necessary configurations for self-hosting.git clone https://github.com/hyperdxio/hyperdx.git
cd hyperdx
# switch to the v2 branch
git checkout v2 -
Configure HyperDX's database connection: Before you start up HyperDX and other components, you'll typically replace the
mongoservice with your ferretdb service. Update theMONGO_URIenvironment variable for HyperDX (with service namedapp) to point to your FerretDB instance.environment:
- MONGO_URI=mongodb://<username>:<password>@ferretdb:27017/hyperdxEnsure to replace
<username>and<password>with your FerretDB authentication details if enabled and that the container can access your FerretDB instance. Comment out the MongoDB service (set asdb) in thedocker-compose.ymlfile, since you will be using FerretDB instead. Since you are commenting out the MongoDB service (db), ensure to remove any references to it in thedocker-compose.ymlfile, such as thedepends_onsection for theappservice.Learn more about setting up HyperDX via Docker Compose from the Self-Hosting Documentation
-
Launch HyperDX and test: Once configured, start your Docker Compose services by running:
docker-compose up -dHyperDX should connect to FerretDB, initialize its database, and begin processing data. You can now access your HyperDX instance, configure data sources (e.g., send logs via OpenTelemetry Collector), and start observing your application's behavior, with relevant metadata and configuration seamlessly stored in FerretDB.
Exploring and visualizing data in HyperDX
To simulate appropriate data ingestion, let's use the ClickHouse OpenTelemetry Collector to send sample logs to HyperDX. Start by populating the HyperDX UI with sample data by running the following commands in your terminal:
curl -O https://storage.googleapis.com/hyperdx/sample.tar.gz
This file includes sample logs, traces, and metrics from the HyperDX public OpenTelemetry demo, which features a simple e-commerce store with microservices.
To load this data, you will send it to the HTTP endpoint of the deployed OpenTelemetry (OTel) collector. If you have set up HyperDX using the Docker Compose setup above, the OTel collector should be running on port 4318.
From within the HyperDX UI, you can find the Ingestion API key under Settings > Ingestion API Key. This key is required to authenticate your data ingestion requests. Set it up as an environment variable in your terminal session:
export CLICKSTACK_API_KEY=<YOUR_INGESTION_API_KEY>
Run the following command to send the data to the OTel collector:
for filename in $(tar -tf sample.tar.gz); do
endpoint="http://localhost:4318/v1/${filename%.json}"
echo "loading ${filename%.json}"
tar -xOf sample.tar.gz "$filename" | while read -r line; do
    echo "$line" | curl -s -o /dev/null -X POST "$endpoint" \
    -H "Content-Type: application/json" \
    -H "authorization: ${CLICKSTACK_API_KEY}" \
    --data-binary @-
done
done
This command extracts each JSON file from the sample.tar.gz archive and sends it to the OTel collector's ingestion endpoint.
Ensure to run this command in the same directory where you downloaded the sample.tar.gz file.
Once the data is ingested, you can access the HyperDX dashboard at http://localhost:8080 (or the port you configured) and explore the sample data.
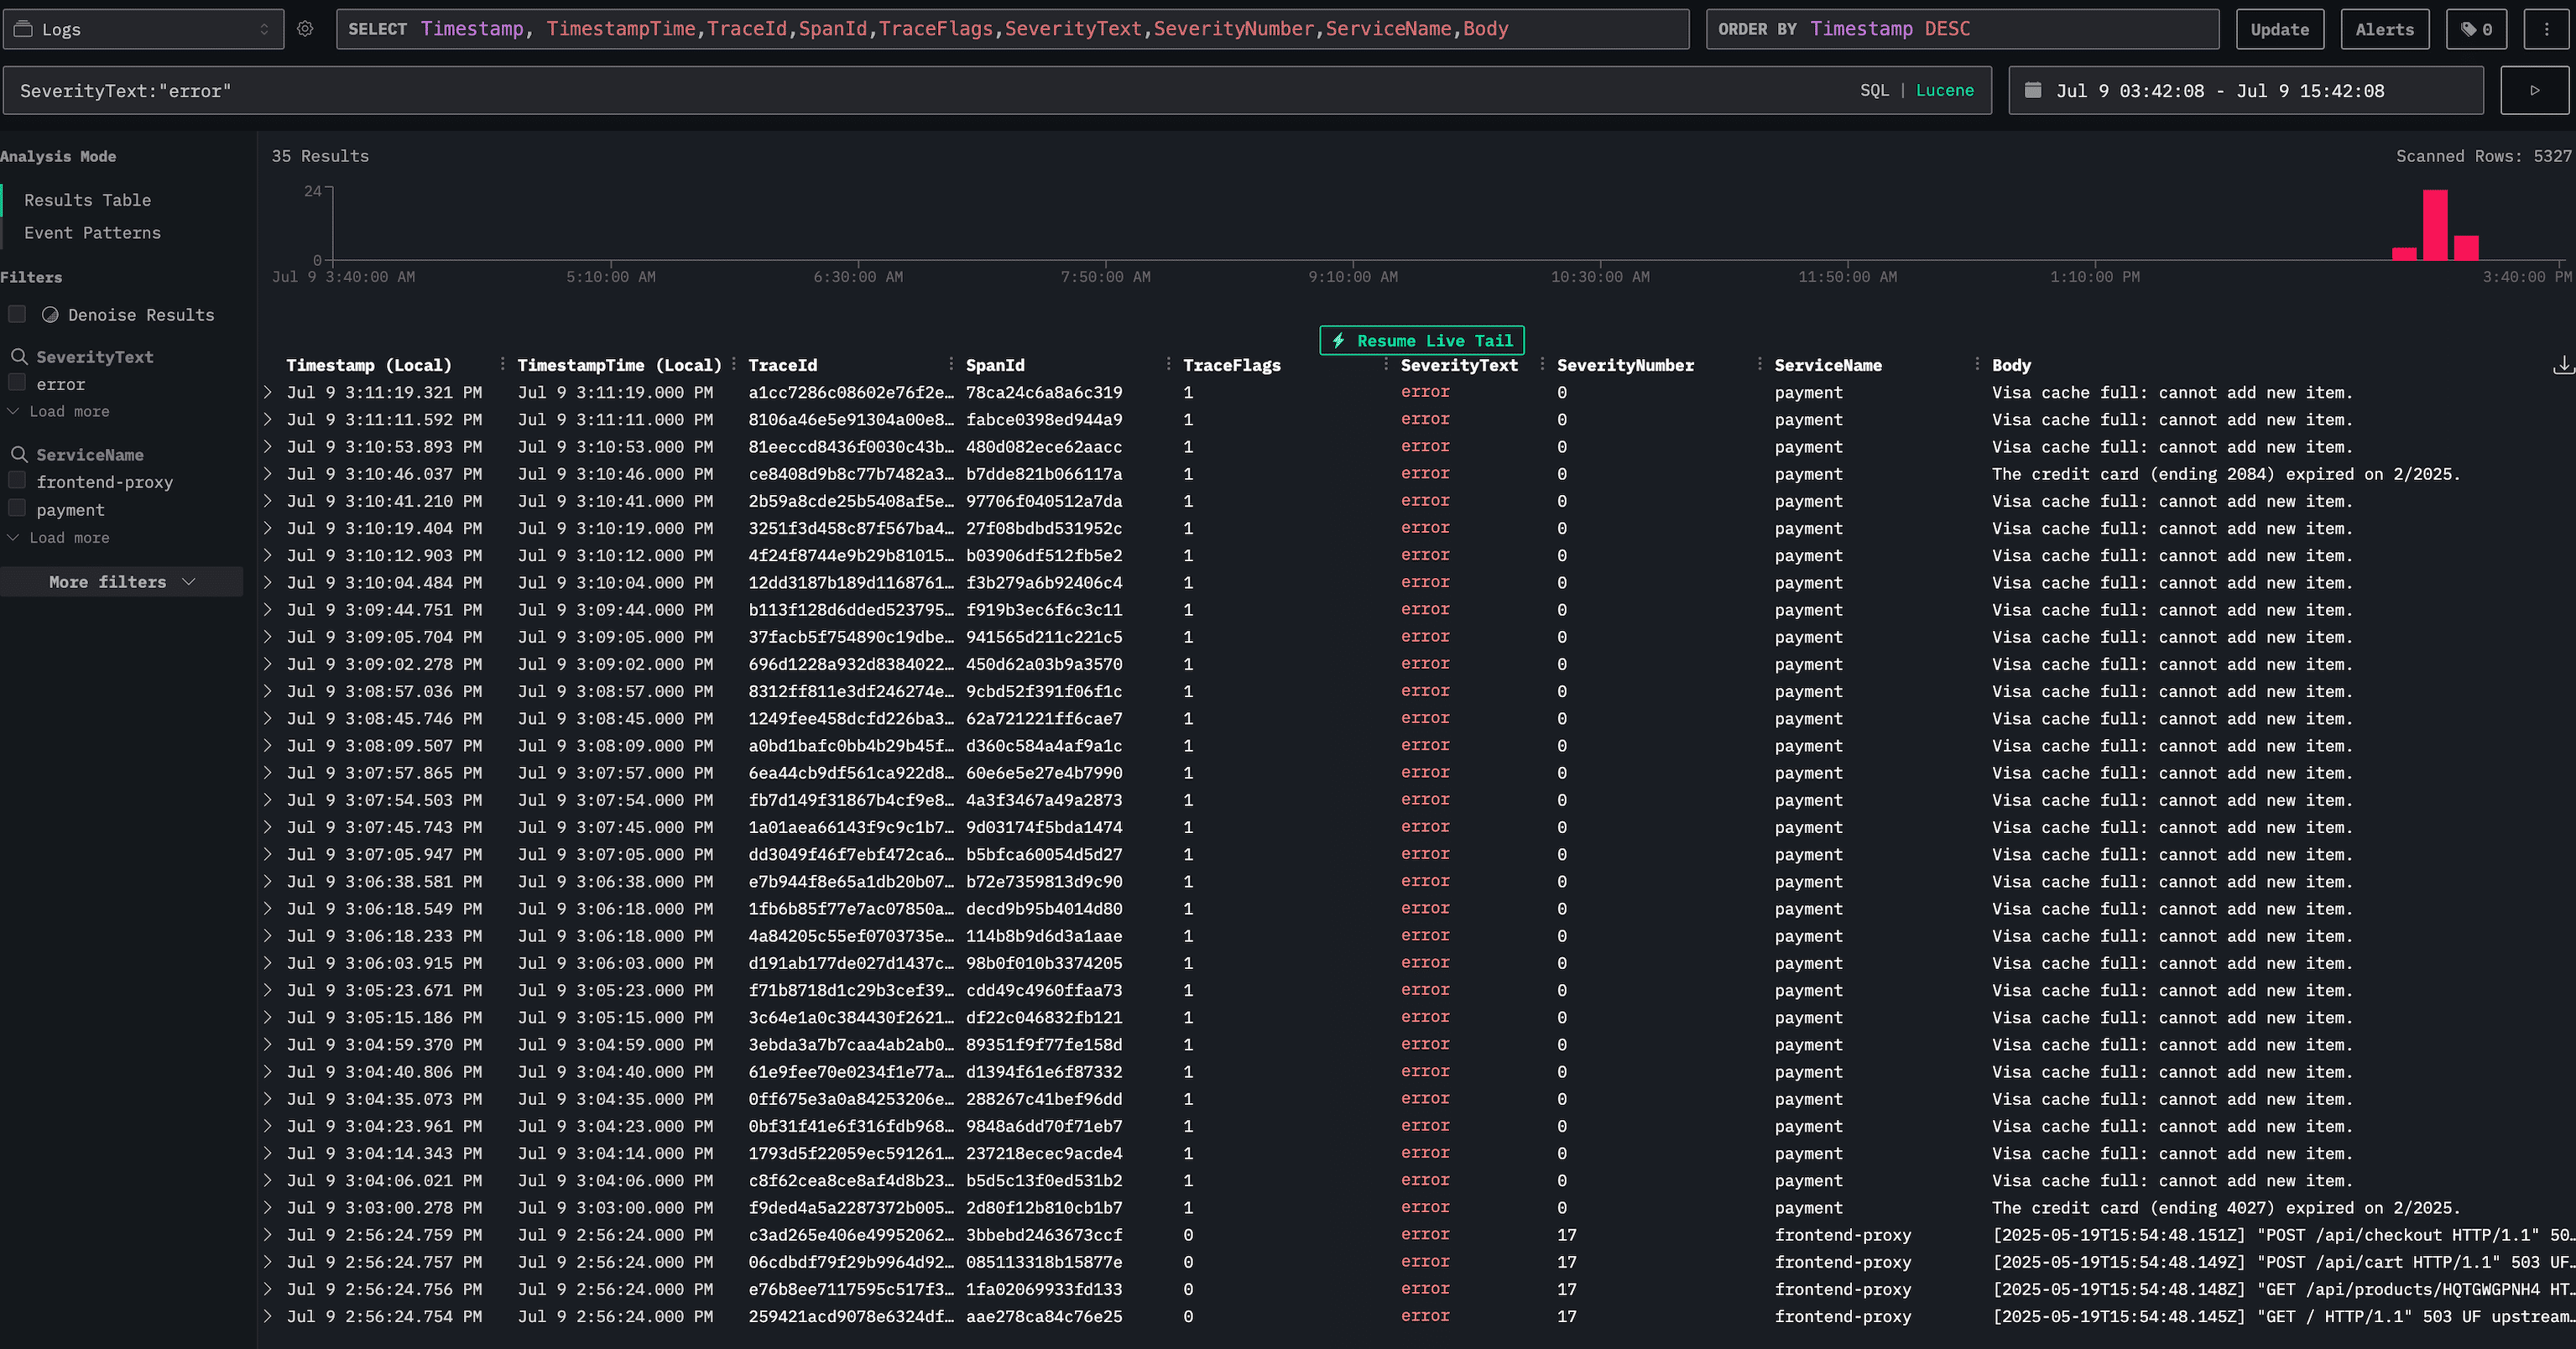
You can visualize logs, traces, and metrics, set up alerts, and create dashboards to monitor your application's performance.
Above, a search query is set up to filter logs by their severity level, specifically looking for logs with the SeverityText: "error".
This particular query is stored as a saved search in HyperDX – stored in FerretDB – allowing you to quickly access it later.
Inspecting HyperDX data in FerretDB
After setting up, you can inspect how HyperDX stores its metadata and configuration within FerretDB.
Connect to your FerretDB instance (mongodb://<username>:<password>@localhost:27017/hyperdx) using a MongoDB shell or GUI tool (like MongoDB Compass or Mongo Express).
List the collections by running the command show collections:
> show collections
alerthistories
alerts
connections
dashboards
savedsearches
sessions
sources
teaminvites
teams
users
webhooks
HyperDX creates various collections to manage its configuration, user data, saved searches, dashboards, and metadata related to logs, traces, and metrics.
Now, let's query the savedsearches collection by running db.savedsearches.find().limit(1):
{
    _id: ObjectId('686ec64e5ffd99745348025d'),
    team: ObjectId('686bfc370e004ddccadfb96d'),
    name: 'error-label',
    select:
    'Timestamp, TimestampTime,TraceId,SpanId,TraceFlags,SeverityText,SeverityNumber,ServiceName,Body',
    where: 'SeverityText:"error"',
    whereLanguage: 'lucene',
    orderBy: '',
    source: ObjectId('686ec5865ffd997453480051'),
    tags: [],
    createdAt: ISODate('2025-07-09T19:43:10.224Z'),
    updatedAt: ISODate('2025-07-09T19:43:10.224Z'),
    __v: 0
}
This output demonstrates that HyperDX successfully writes and reads its document-based configuration and metadata into FerretDB, which in turn stores it efficiently in PostgreSQL, providing a reliable backend for your full-stack observability platform.
Conclusion
The integration of HyperDX and FerretDB provides a robust, scalable, and fully open-source solution for centralizing and managing your full-stack observability data.