Add MongoDB Compatibility to Ubicloud Managed Postgres

A database infrastructure setup will certainly impact the success of your business, or any business for that matter. You definitely don't want to wake up at 2 AM because your database went down, transactions stopped going through, and customers are angry.
Of course, that's without factoring in the loss of revenue or reputation damage.
As more users opt for FerretDB as their open source MongoDB alternative database, with Postgres as the backend, it's crucial that database costs and performance meet your needs.
Managing your data on MongoDB Atlas can lead to some astronomical costs as you grow and scale your business. And there's still the risk of getting vendor-locked!
Surely, you don't want that.
Instead, having a simpler, portable, and open cloud as your Postgres backend for FerretDB can save you from these particular problems.
In this article, we'll describe the steps needed to set up a FerretDB Postgres backend on Ubicloud for a Python application.
Understanding Managed Postgres on Ubicloud
Ubicloud is an open and portable cloud that reduces costs and offers you control of your entire infrastructure. You can set up Ubicloud on bare metal instances or use its managed offering without installing anything. Ubicloud's Managed Postgres provides you with a fast database experience that's also 3x more cost-effective than comparable solutions. It also comes with automatic backups and point-in-time restores, dedicated VMs for every Postgres server, and encryption at-rest and in-transit.
FerretDB is an open-source document database that adds MongoDB compatibility to other relational database backends like Postgres and SQLite.
Simply put: you can manage your entire FerretDB database on Ubicloud using its managed Postgres offering, with complete control and no fear of vendor lock-in.
How to configure FerretDB for Ubicloud
Prerequisites
- Ubicloud Postgres connections URI
- psql
- Docker
mongosh
Create a Postgres instance on Ubicloud
FerretDB requires a Postgres connection string that'll serve as the database backend. At present, FerretDB supports Postgres and SQLite, with work still ongoing on other database backends. The first thing to do is to set up a Postgres instance on Ubicloud.
Follow this documentation to create a managed Postgres instance on Ubicloud -https://www.ubicloud.com/docs/managed-postgresql/quickstart
Once you complete the documentation, you should have a default postgres user connection string that follows the format:
postgres://postgres:<password>@<host address>
Next, create a ferretdb database with user and password credentials with permissions to the database.
Using psql:
psql <ubicloud-postgres-connection-string>
CREATE USER ferretuser WITH PASSWORD <password>;
CREATE DATABASE ferretdb OWNER ferretuser;
GRANT ALL PRIVILEGES ON DATABASE ferretdb TO ferretuser;
Fantastic! Now we can go ahead to run FerretDB.
How to run FerretDB
You can run FerretDB locally via Docker.
We need to assign a Postgres connection string to the FerretDB FERRETDB_POSTGRESQL_URL environment variable.
We can do this by connecting to the ferretdb database using the ferretuser and password credentials we created.
The postgres connection string for ferretuser should now follow this format:
postgres://ferretuser:<password>@<postgres-server-hostname>/ferretdb
Run this command in your terminal to pull and run the FerretDB image.
docker run -e FERRETDB_POSTGRESQL_URL=<ferretuser-connection-string> ghcr.io/ferretdb/ferretdb
Once that's successful, proceed to connect with your FerretDB instance via mongosh.
FerretDB currently supports PLAIN authentication so you'll need to provide that along with your MongoDB URI.
mongosh 'mongodb://<ferretuser>:<ferretuser-password>@127.0.0.1:27017/ferretdb?authMechanism=PLAIN'
Now that we're in, you can see the latest version of FerretDB (v1.18.0).
Current Mongosh Log ID: 65afa52615e82bd1fc9d4371
Connecting to:  mongodb://<credentials>@127.0.0.1:27018/ferretdb?authMechanism=PLAIN&directConnection=true&serverSelectionTimeoutMS=2000&appName=mongosh+2.1.0
Using MongoDB:    7.0.42
Using Mongosh:    2.1.0
mongosh 2.1.1 is available for download: https://www.mongodb.com/try/download/shell
For mongosh info see: https://docs.mongodb.com/mongodb-shell/
------
   The server generated these startup warnings when booting
   2024-01-23T11:38:17.837Z: Powered by FerretDB v1.18.0 and PostgreSQL 16.1.
   2024-01-23T11:38:17.837Z: Please star us on GitHub: https://github.com/FerretDB/FerretDB.
   2024-01-23T11:38:17.837Z: The telemetry state is undecided.
   2024-01-23T11:38:17.837Z: Read more about FerretDB telemetry and how to opt out at https://beacon.ferretdb.io.
------
ferretdb>
Let's use a simple Python application to query and insert documents into the instance.
Test with Python contact application
I've set up a Flask Python contact app with basic CRUD operations connected to our FerretDB instance using pymongo.
Start by creating a Flask app folder for our project:
mkdir ContactApp
cd ContactApp
touch app.py
After setting up the structure, start coding the Flask application in app.py, and then design the web pages in the HTML files within the templates directory.
In the same terminal, run:
mkdir templates
touch templates/index.html templates/update.html
In the index.html file, add this:
<!doctype html>
<html lang="en">
  <head>
    <meta charset="UTF-8" />
    <title>Contact Book</title>
    <link
      rel="stylesheet"
      href="https://cdn.jsdelivr.net/npm/semantic-ui@2.4.2/dist/semantic.min.css"
    />
    <script>
      function confirmDelete(contact_id) {
        if (confirm('Are you sure you want to delete this contact?')) {
          document.getElementById('delete-form-' + contact_id).submit()
        }
      }
    </script>
  </head>
  <body class="ui container">
    <h1>Contact Book</h1>
    <form action="/add" method="POST" class="ui form">
      <div class="ui form">
        <div class="four fields">
          <div class="field">
            <label>Name</label>
            <input type="text" name="name" placeholder="Name" required />
          </div>
          <div class="field">
            <label>Phone</label>
            <input type="tel" name="phone" placeholder="Phone" />
          </div>
          <div class="field">
            <label>Email</label>
            <input type="email" name="email" placeholder="Email" />
          </div>
        </div>
        <button class="ui green button" type="submit">Add Contact</button>
      </div>
    </form>
    <table class="ui celled table">
      <thead>
        <tr>
          <th>Name</th>
          <th>Phone</th>
          <th>Email</th>
          <th>Actions</th>
        </tr>
      </thead>
      <tbody>
        {% for contact in contacts %}
        <tr>
          <td>{{ contact['name'] }}</td>
          <td>{{ contact['phone'] }}</td>
          <td>{{ contact['email'] }}</td>
          <td>
            <a href="/update/{{ contact['_id'] }}" class="ui yellow button"
              >Update</a
            >
            <form
              id="delete-form-{{ contact['_id'] }}"
              action="/delete/{{ contact['_id'] }}"
              method="post"
              style="display: inline;"
            >
              <button
                type="button"
                onclick="confirmDelete('{{ contact['_id'] }}')"
                class="ui red button"
              >
                Delete
              </button>
            </form>
          </td>
        </tr>
        {% endfor %}
      </tbody>
    </table>
  </body>
</html>
Add this to the update.html:
<!DOCTYPE html>
<html lang="en">
<head>
   <meta charset="UTF-8">
   <title>Contact Book</title>
   <link rel="stylesheet" href="https://cdn.jsdelivr.net/npm/semantic-ui@2.4.2/dist/semantic.min.css">
</head>
<body class="ui container">
   <h1>Update Contact</h1>
   <form action="/update/{{ contact['_id'] }}" method="post" class="ui form">
       <div class="ui form">
           <div class="four fields">
               <div class="field">
                   <input type="text" name="name" value="{{ contact['name'] }}" placeholder="Name" required>
               </div>
               <div class="field">
                   <input type="tel" name="phone" value="{{ contact['phone'] }}" placeholder="Phone">
               </div>
               <div class="field">
                   <input type="email" name="email" value="{{ contact['email'] }}" placeholder="Email">
               </div>
               <button type="submit" class="ui green button">Update Contact</button>
           </div>
   </form>
   </div>
</body>
</html>
Add the following code to your app.py code:
import os
from flask import Flask, render_template, request, redirect, url_for
from pymongo import MongoClient
from bson.objectid import ObjectId

app = Flask(__name__)

mongo_uri = os.getenv('MONGO_URI', 'mongodb://localhost:27017/')
client = MongoClient(mongo_uri)
db = client.ferretdb
contacts_collection = db.contacts

@app.route('/')
def index():
   contacts = contacts_collection.find()
   return render_template('index.html', contacts=contacts)

@app.route('/add', methods=['POST'])
def add_contact():
   try:
       name = request.form.get('name')
       phone = request.form.get('phone')
       email = request.form.get('email')
       contacts_collection.insert_one({'name': name, 'phone': phone, 'email': email})
   except Exception as e:
       message = f"An error occurred: {e}"
   return redirect(url_for('index'))

@app.route('/delete/<contact_id>', methods=['POST'])
def delete_contact(contact_id):
   try:
       contacts_collection.delete_one({'_id': ObjectId(contact_id)})
   except Exception as e:
       message = f"An error occurred while deleting the contact: {e}"

   return redirect(url_for('index'))

@app.route('/update/<contact_id>', methods=['GET', 'POST'])
def update_contact(contact_id):
   contact = contacts_collection.find_one({'_id': ObjectId(contact_id)})

   if request.method == 'POST':
       try:
           updated_data = {
               'name': request.form.get('name'),
               'phone': request.form.get('phone'),
               'email': request.form.get('email')
           }
           contacts_collection.update_one({'_id': ObjectId(contact_id)}, {'$set': updated_data})
       except Exception as e:
           message = f"An error occurred while updating the contact: {e}"
       return redirect(url_for('index'))

   return render_template('update.html', contact=contact)

if __name__ == '__main__':
   app.run(debug=True)
Before running the app, set up the MongoDB connection string as an environment variable.
Do that by running:
export MONGO_URI=mongodb://<mongodb-URI>
In the root directory of the Flask app where you have app.py, start the app using:
python app.py
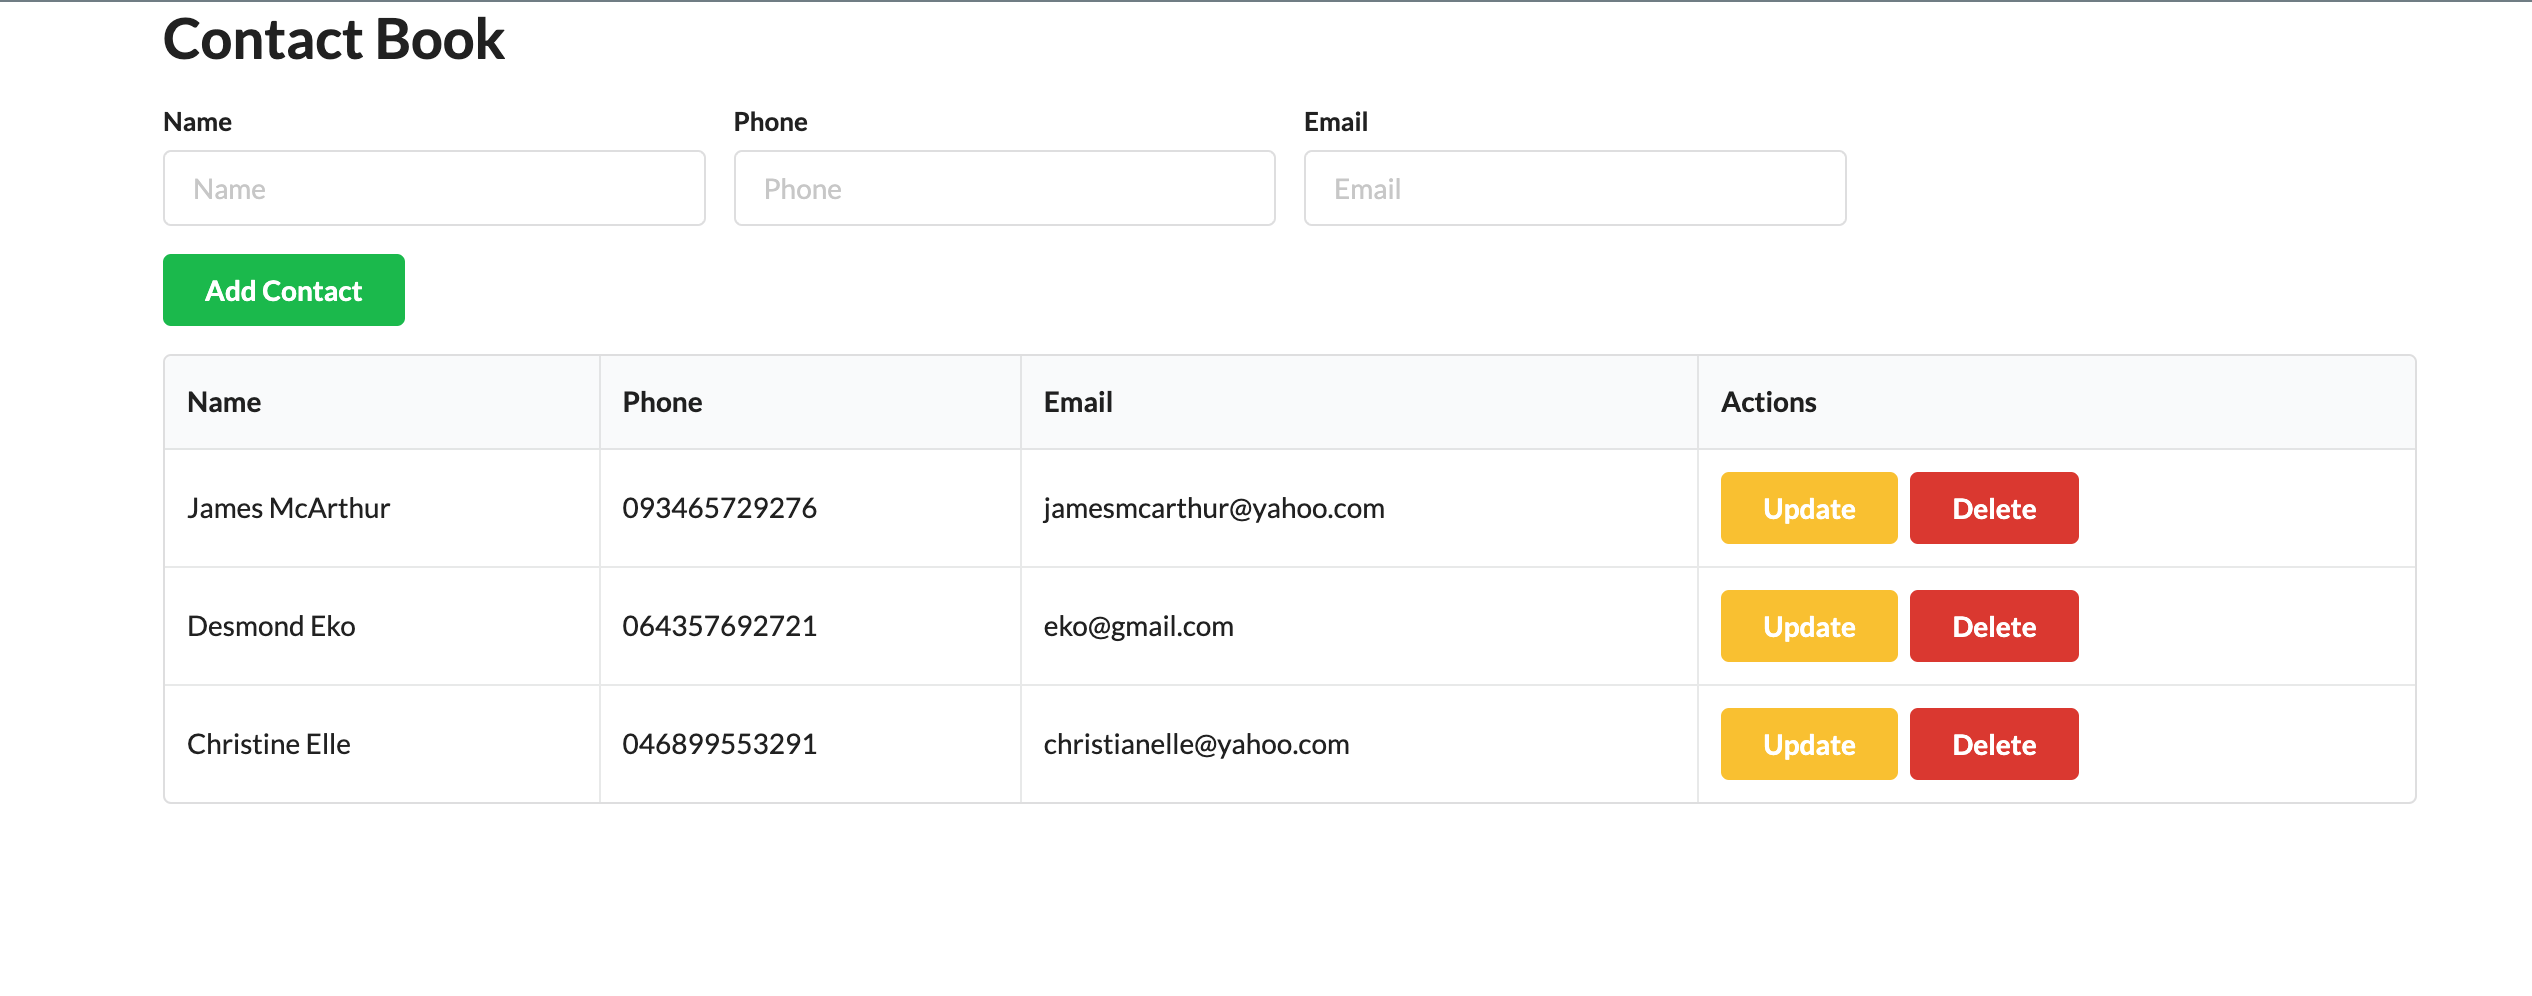
We'll add the following contact details to the app:
James McArthur  093465729276  jamesmcarthur@yahoo.com
Desmond Eko 064357692721  eko@gmail.com
Christine Elle  046899553291  christianelle@yahoo.com

To showcase the update feature, go ahead to update the name Desmond Eko to Andrew Eko via the update button.
You can also try deleting a record in the contact list.
Read data in psql
We can view the current data state in Postgres by connecting via psql, or any other Postgres GUI tool you prefer. Using the Postgres connection string from Ubicloud, run:
psql <postgres-connection-string>
This will connect us to the ferretdb database.
Set the search_path to ferretdb:
set search_path to ferretdb;
We can explore the current state of the contact list in Ubicloud; FerretDB stores the data as JSONB in Postgres.
ferretdb=> \dt
                       List of relations
   Schema    |            Name             | Type  |   Owner
-------------+-----------------------------+-------+------------
 ferretdb | _ferretdb_database_metadata | table | ferretuser
 ferretdb | contacts_cedcb8f0           | table | ferretuser
(2 rows)
ferretdb=> table contacts_cedcb8f0;
                                                                                                                                           _jsonb
---------------------------------------------------------------------------------------------------------------------------------------------------------------------------------------------------------------------------------------------------------------------------------------------
 {"$s": {"p": {"_id": {"t": "objectId"}, "name": {"t": "string"}, "email": {"t": "string"}, "phone": {"t": "string"}}, "$k": ["_id", "name", "phone", "email"]}, "_id": "65afb5c8f1f80562d49e2076", "name": "James McArthur", "email": "jamesmcarthur@yahoo.com", "phone": "093465729276"}
 {"$s": {"p": {"_id": {"t": "objectId"}, "name": {"t": "string"}, "email": {"t": "string"}, "phone": {"t": "string"}}, "$k": ["_id", "name", "phone", "email"]}, "_id": "65afb655f1f80562d49e2078", "name": "Christine Elle\t", "email": "christianelle@yahoo.com", "phone": "046899553291"}
 {"$s": {"p": {"_id": {"t": "objectId"}, "name": {"t": "string"}, "email": {"t": "string"}, "phone": {"t": "string"}}, "$k": ["_id", "name", "phone", "email"]}, "_id": "65afb5f1f1f80562d49e2077", "name": "Andrew Eko", "email": "eko@gmail.com", "phone": "064357692721"}
(3 rows)
ferretdb=>
Summary
Ubicloud Managed Postgres is suitable for users looking for an open and cost-effective solution. It's also a great fit for users who are already using Hetzner data centers and need a Managed Postgres offering.
FerretDB offers an additional possibility – a chance to add MongoDB compatibility to Ubicloud Managed Postgres. As an open-source software, you won't have to worry about vendor lock-in.
To get started with FerretDB, check out quickstart documentation.
